If you are one of those programmers that like to test their applications in all operating systems available, then you are probably using Virtual PC (or some other Virtual Machine software) to make your life a bit easier. Easier because you have multiple operating systems on one computer without using dual boot and having to restart your development operating system and applications/tools.
If you have VirtualBox then check my other article for VirtualBox.
Presumably you already have Visual Studio and Virtual PC installed so let’s start.
Configure Networking adapters
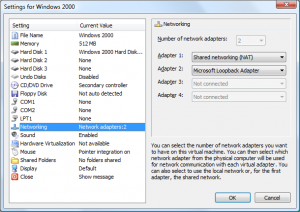
First you have to configure your virtual machine network adapters so that your host and guest operating systems can communicate with each other.
When it comes to configuring Virtual PCs network adapters, I select “Shared networking (NAT)” for my first adapter because I want to have internet connection from my host computer and for my second adapter I select “Microsoft Loopback Adapter” which is the key to host and guest operating system connectivity.
If you are thinking “that’s cool for you, but i don’t have no Loopback adapter to select” then you have to install it on your HOST operating system:
- go to “Control Panel”
- go to “Add Hardware”
- in the “Add Hardware” wizard, click “Next”
-
Windows XP:
- when the “Is the hardware connected?” page appears, select “Yes, I have already connected the hardware”, then click “Next”
- in the “Installed hardware” list, select “Add a new hardware device” (usually last item) and then click “Next”
- now select “Install the hardware that I manually select from a list (Advanced)”, then click “Next”
- find and select “Network adapters”, click “Next”
- in “Manufacturer” list, select “Microsoft” and in the “Network Adapter” list, select “Microsoft Loopback Adapter”, click “Next”
- Finish
-
Windows Vista:
- in the “What do you want the wizard to do?” list, select “Install the hardware that I manually select from a list (Advanced)”, click “Next”
- find and select “Network adapters”, click “Next”
- in “Manufacturer” list, select “Microsoft” and in the “Network Adapter” list, select “Microsoft Loopback Adapter”, click “Next”
- Finish
-
Connectability test
Now to test if your guest OS is connectable:
- in your GUEST operating system go to command prompt (Start>Run>type “cmd”)
- type “ipconfig”
- copy IP address from Microsoft Loopback adapter (you will need this IP address again for Visual Studio)
- in your HOST operating system go to command prompt (Start>Run>type “cmd”)
- type “ping IP ADRESS”, where IP ADRESS is that IP address you copied from your GUEST OS
If everything is OK, you should see time taken for your guest operating system to reply. Something like this:
“Reply from 169.254.125.150: bytes=32 time=1ms ttl=128”.
In case you don’t get a reply there is probably some software blocking the connection and you should try to configure windows firewall or some other security software that you have installed in your guest operating system but that is beyond this article.
Copying necessary files to virtual machine
Find Remote Debugger in your Program Files where Visual Studio is installed, for Visual Studio 2008 location is “C:\Program Files\Microsoft Visual Studio 9.0\Common7\IDE\Remote Debugger”. Copy Remote Debugger to virtual machine, location is not important, just remember where you put it so you can find it later :).
Start Remote Debugger and go into Tools>Options, change “Authentication mode” to “No Authentication (native only)”.
Copy your binary files into the virtual machine OR create a “Shared Folder” to your applications folder. Second option is better because you don’t have to copy your binary files every time you compile them.
Configuring Visual Studio
NOTE: You should make a new configuration for your project in Visual Studio if you will be doing this remote debugging a lot. If you just change the properties of your current “Debug” configuration than you will have to change following settings manually every time you want to switch between local and remote debugging.
From Visual Studio:
- go to menu “Project”, select your project “Properties”
- go to “Debugging”
- for “Debugger to launch” select “Remote Windows Debugger”
- for “Remote Command” enter the path to your application, for example “C:\my app.exe”
- for “Remote Server Name” enter computer name or IP address of your GUEST OS
- for “Connection” select “Remote with no authentication (Native Only)”
- that is it, happy debugging :)
Or if you just need to attach debugger to your application in virtual machine then you can do this instead:
- go into menu “Debug”, then “Attach to process”
- for “Transport” select “Remote (Native only with no authentication)”
- for “Qualifier” enter IP address from your GUEST operating system OR better enter computer name from that operating system (this is better because IP address is dynamical and computer name does not change, unless you change it yourself)
- find you application in available processes and attach debugger to it
- that is it
Notes
I should mention that non authenticated connection is not secure but that should not be a big deal for connection between host and a virtual machine. Multiple virtual machines can be run with one Loopback adapter (no need to install new one for every virtual machine).
Everything said here works also for Sun’s VirtualBox (and probably for VMWare).

hey i found your blog today and I have read some great posts over here. I just wanna thanks you for posting it so we all can learn about it!
Thank you spammer man! I hope you don’t mind me removing all the spam links from your comment?